Fall Fun With Your Toddlers & Preschoolers
Written by RaDeana Montgomery, RAM Media
Autumn is a wonderful and magical time of the year, especially for children. The vibrant colours of the leaves, the crisp air, and the abundance of pumpkins make it an excellent season for outdoor activities with toddlers and preschoolers.
Here are ten fun and educational ideas that, as a child care provider, you can incorporate into your planning.
- Leaf Scavenger Hunt: Take your children on a nature walk and have them collect different types of leaves; you can teach them about the various shapes and colours of the leaves, and for more leaf fun, bring some back with you and let the children colour or put faces on the leaves, making great art pieces for parents to hang and enjoy.
- Nature Art: Aside from collecting leaves on your nature walk, look for acorns and pinecones, collect them, and use them to create nature-inspired art.
- Fall Picnic: This one is simple to do. Organize a fall-themed picnic in your backyard or park. Bring autumn snacks like apple slices or warm cider for the children to enjoy.
- Leaf Pile: This activity is fun for all ages. Rake the leaves into a big pile and let the children enjoy jumping and playing. Jumping in leaves is a classic activity everyone will enjoy with a laugh or two.
- Storytime in Nature: Find a cozy space outside and read a fall-themed children’s book. Encourage discussions about the changing seasons and the animals that are getting ready to prepare for the winter. Watch for squirrels that are gathering nuts for the winter. The book Sky Tree: Seeing Science Through Art, by Thomas Locker, is lovely.
- Scarecrow Making: This can be a lot of fun. Work together to create a friendly scarecrow using old clothing. Have the children each bring a piece of clothing, stuff with leaves or hay, and use a pumpkin for the head. Or be creative and use other elements that you might have at home. This activity is fun for teaching children about recycling and about the purpose of a scarecrow.
- Harvest Sensory Play: Set up sensory bins with materials like dried corn, colourful leaves, acorns, and gourds. Sensory play allows children to explore all different textures, shapes, and sizes.
- Fall Scavenger Hunt: Make a scavenger hunt list or use pre-made printable graphics to show the children what you will be looking for. Take a walk in your backyard or local park and see how many items on the list you and the children can find together. Take pictures of everything and create a picture book of the adventure together.
- Handprint Leaf Picture: This will be one of those extraordinary works of art parents will keep forever. It can be messy, so it is best to do it outside, but the memories it creates will make up for that. Use a canvas or large piece of paper. Paint a trunk, then let the children go to town making leaves with their hands and finger prints. When the little artists are done, you will have a beautiful work of art.
- Pumpkin Decorating: Have a pumpkin decorating session where children can paint, draw on, or stick decorations to their pumpkins.

Remember always to prioritize safety and supervision during outdoor activities. These experiences let children appreciate the beauty of fall and offer opportunities for hands-on learning and development. Autumn is one of the best seasons for children to explore and engage with nature.
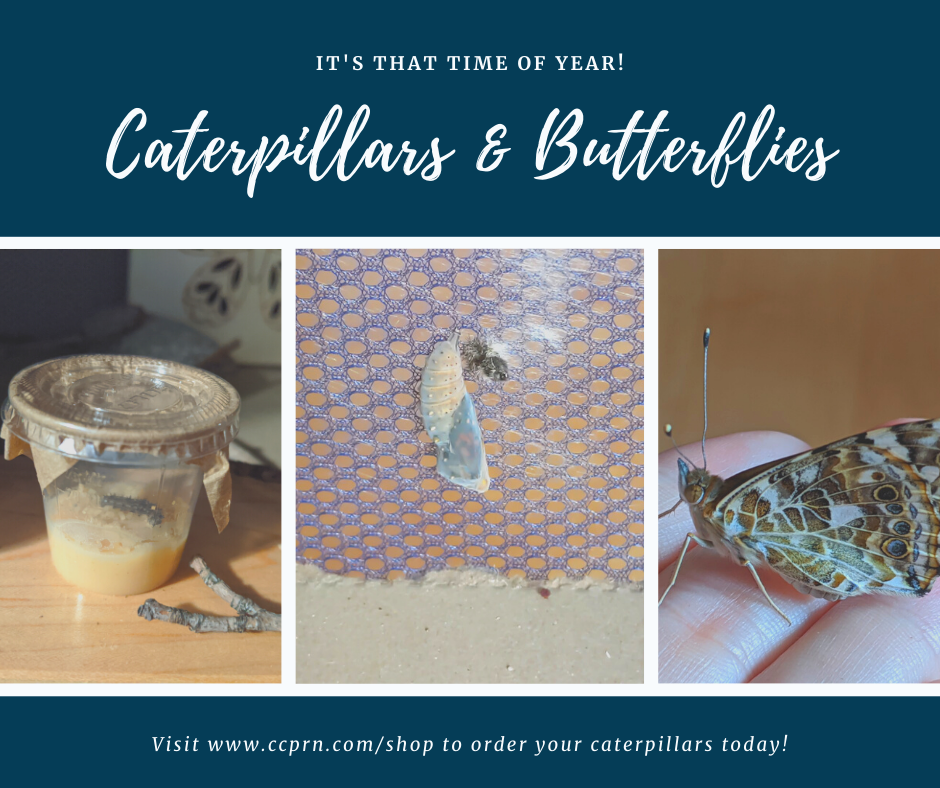
Caring for Caterpillars
Written by Julie Bisnath, BSW RSW
Perfect for a home or child care environment, welcoming live caterpillars is easy and engaging. The caterpillars arrive in their own individual cups with their food included. You provide the habitat, which can be as simple as a jar or small mesh laundry hamper. Once the butterflies emerge, they spend a couple of days drying their wings, providing lots of time for up-close observation. On a nice day, release the butterflies in your yard or garden.
This wonderful experience offers many opportunities to:
- invite children to explore and enjoy caterpillars and butterflies up close
- inspire curiosity and a love for nature
- help children make meaningful connections to the environment & the world around them
- encourage children to wonder and develop their own theories
- examine nature from a scientific perspective
- foster a love for and gentleness toward all living things
Ready to get started?
- Order your Painted Lady caterpillars online at ccprn.com/shop
- 5/$35
- Pick-up your caterpillars in early June 2025 (exact date to be confirmed closer to June, pick-up will be in the evening) in Orleans, Ottawa Central, Barrhaven, or Stittsville.
- Observe and enjoy watching them grow. After 1-2 weeks they will transform into the chrysalis and in 8-10 days will emerge as butterflies.
- Observe and enjoy the butterflies for a few days and then release them outside.
Caring for your caterpillars and butterflies:
5 caterpillars will come in one small container with a cover. In the container with the caterpillars, there is a spoonful of artificial diet (soya flour based).
Leave the container on a shelf away from direct sunlight (and away from pets!) and at room temperature. You can open the cup for a closer look and even very gently hold the caterpillar. The caterpillars grow quickly! Be sure to spend some time enjoying this stage.
The images below feature 1 caterpillar per cup. The 2025 order will be 5 caterpillars per cup.
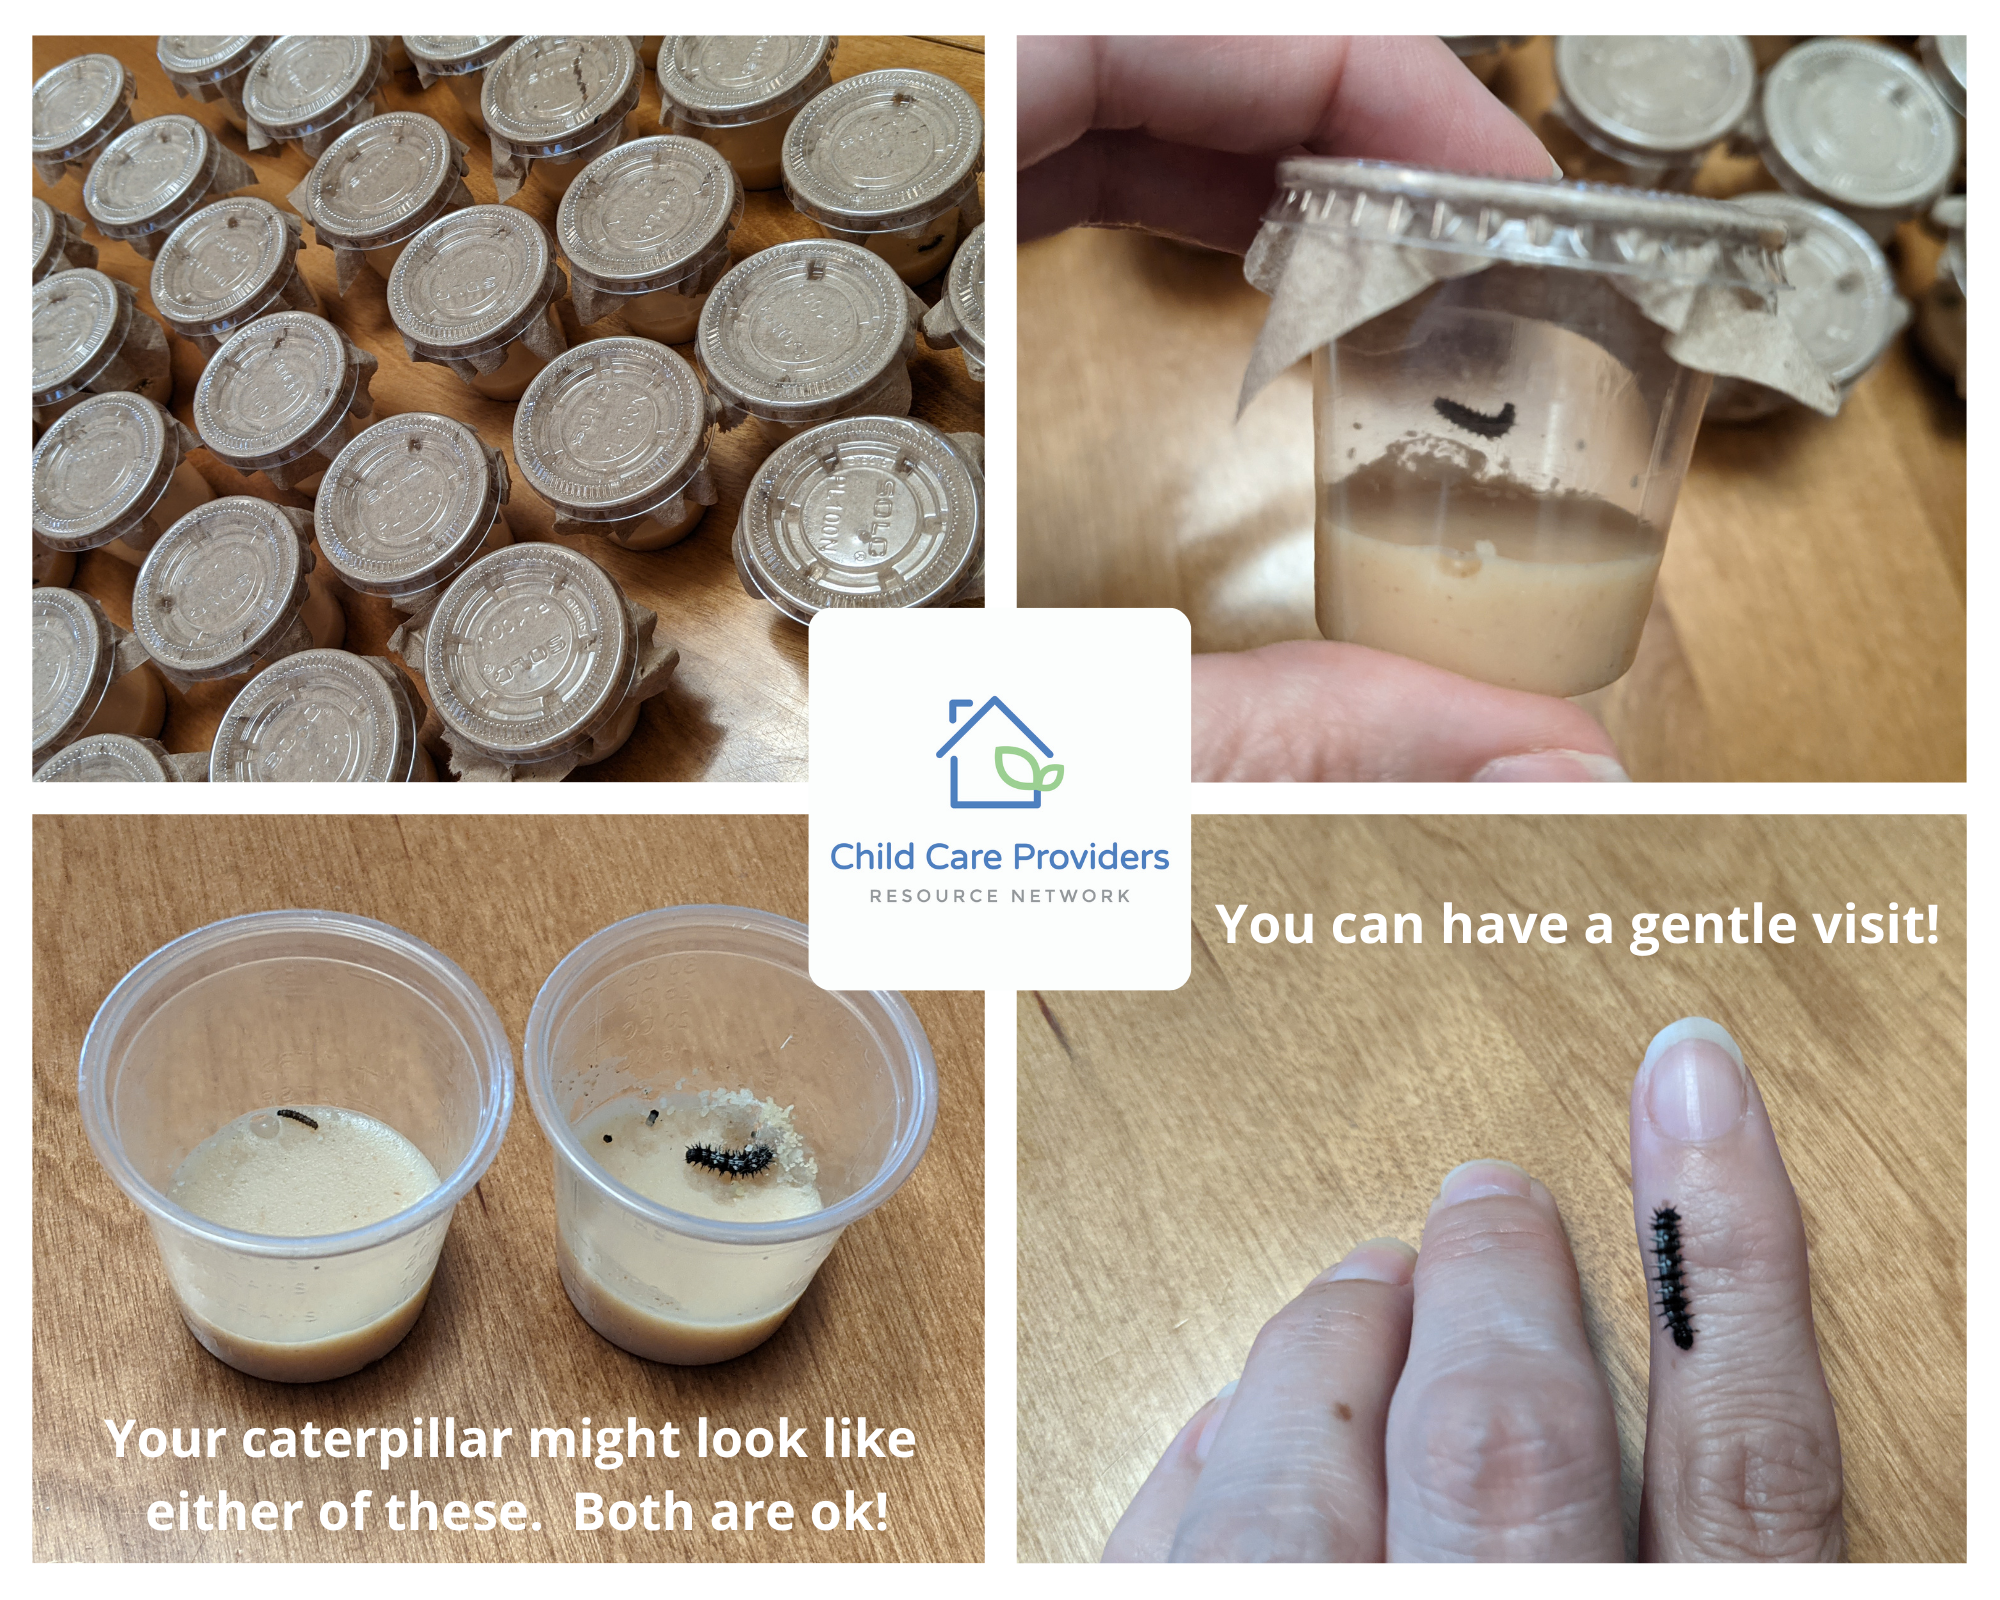
The caterpillars will manage alone and when they are finished feeding, they will push away the frass (caterpillar poop!), hang upside down and transform into a chrysalis or pupa without your help.
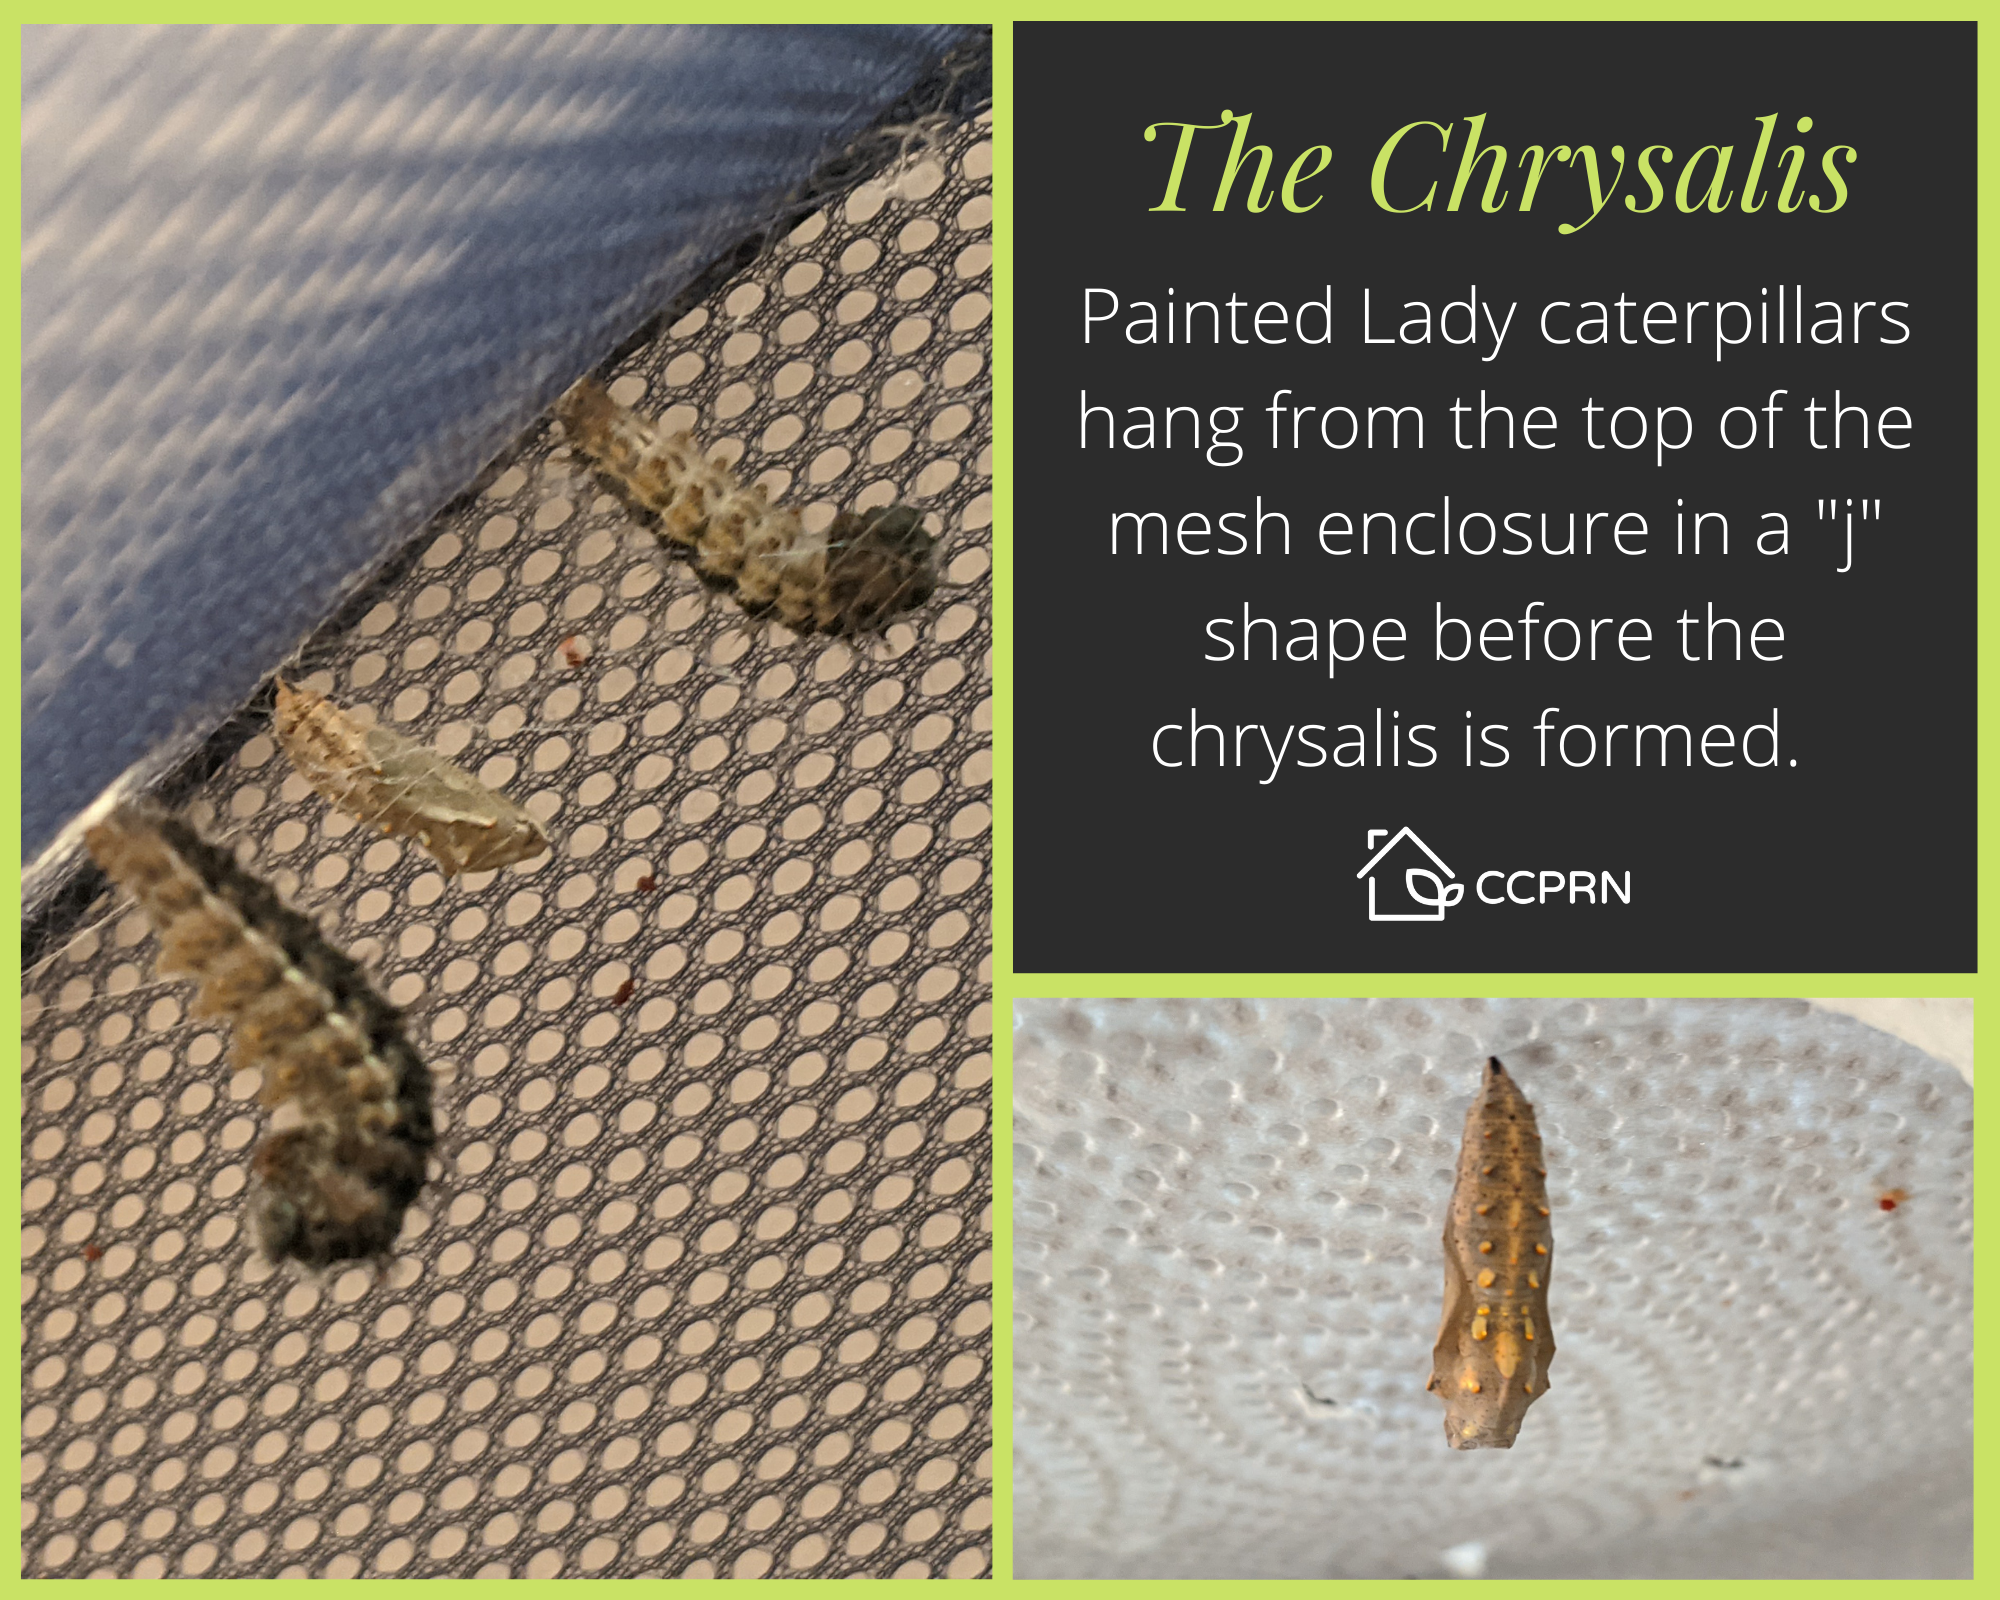
When this happens do not disturb the pupa for 72 hours until it has dried, hardened, and is solid.
Once the pupa is dried and solid, pull the paper towel and chrysalis from the container and pin it into a small flight cage (small mesh hamper—good if you have several caterpillars), about three inches from the bottom. It must be high enough for the butterfly to spread its wings completely and dry them when it emerges. If the pupa is pinned too high in the cage, the butterfly could fall and hurt itself. If the emerging butterfly falls from its chrysalis, it must be able to crawl up again in a hurry to dry its wing, so your flight cage must have a rough wall for it to crawl up. Slippery plastic or glass containers will not do the trick unless you add a wooden branch.
Alternatively, you can place the paper towel and chrysalis on the bottom of a jar or bug container. Include a stick to allow the butterfly to hang from once it emerges. Be sure to cover your jar with some sort of breathable material (mesh, a piece of screen, etc.).
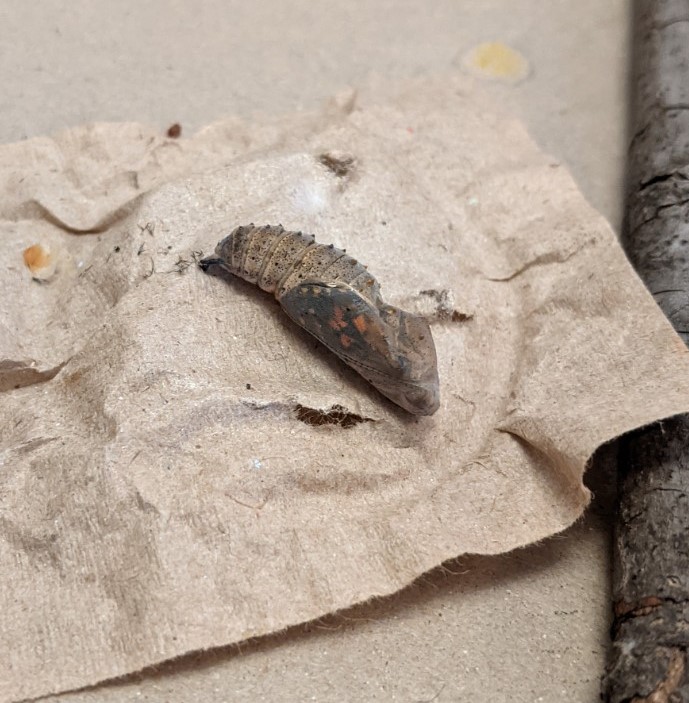
Once the chrysalis becomes translucent, the butterfly will soon emerge. The paper towel and chrysalis shown above were placed at the bottom of the container. When the butterfly emerges it can climb onto the stick and up the branch (not shown) where it will dry its wings.
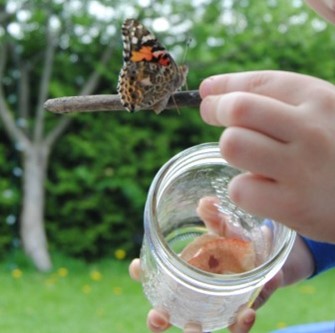
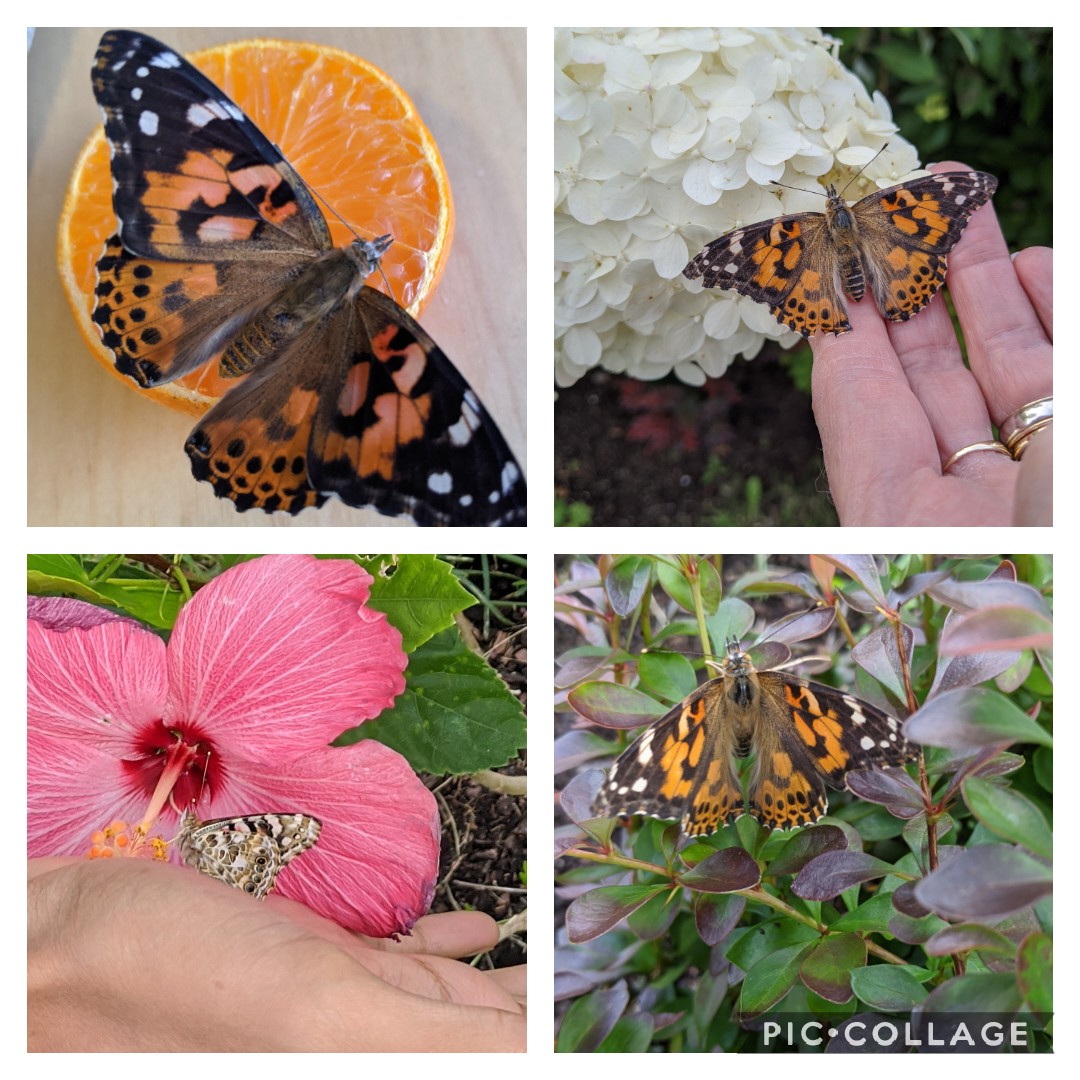
In all, the pupa stage will last eight to ten days. Once the butterflies emerge, they will spend some time (could be a day or two) drying their wings. Place a slice or two of orange at the bottom of the enclosure for the butterflies to drink. Release the butterflies a day or two later into your yard or garden.
Another option:
When the caterpillars are quite large, open the lids of the tiny cups and place them into a larger jar or enclosure (make sure that the lid is breathable yet secure!). Provide sticks for climbing and when the caterpillars are done eating, they will climb to the top and hang directly from the mesh, or from a larger sheet of paper towel.
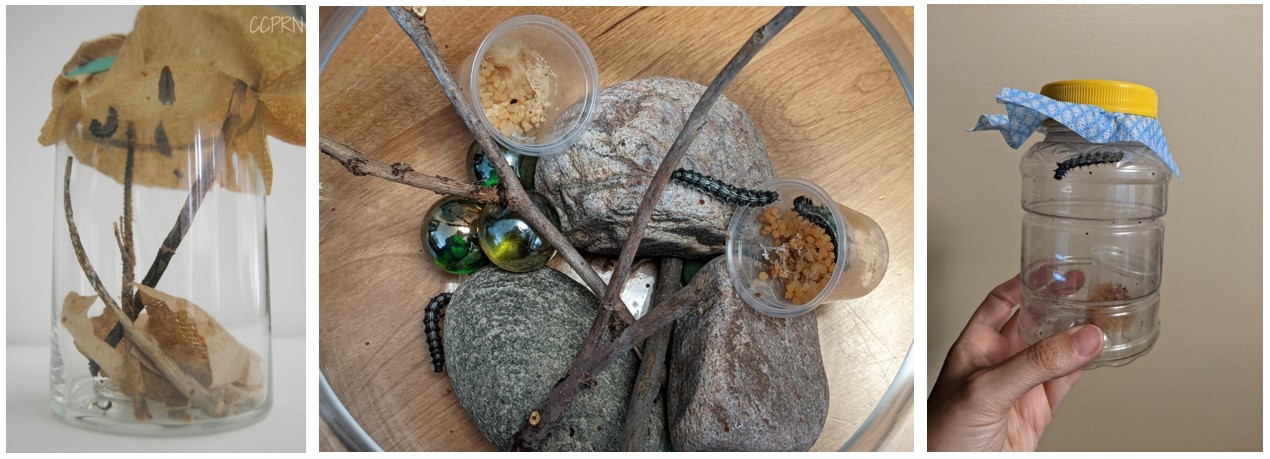
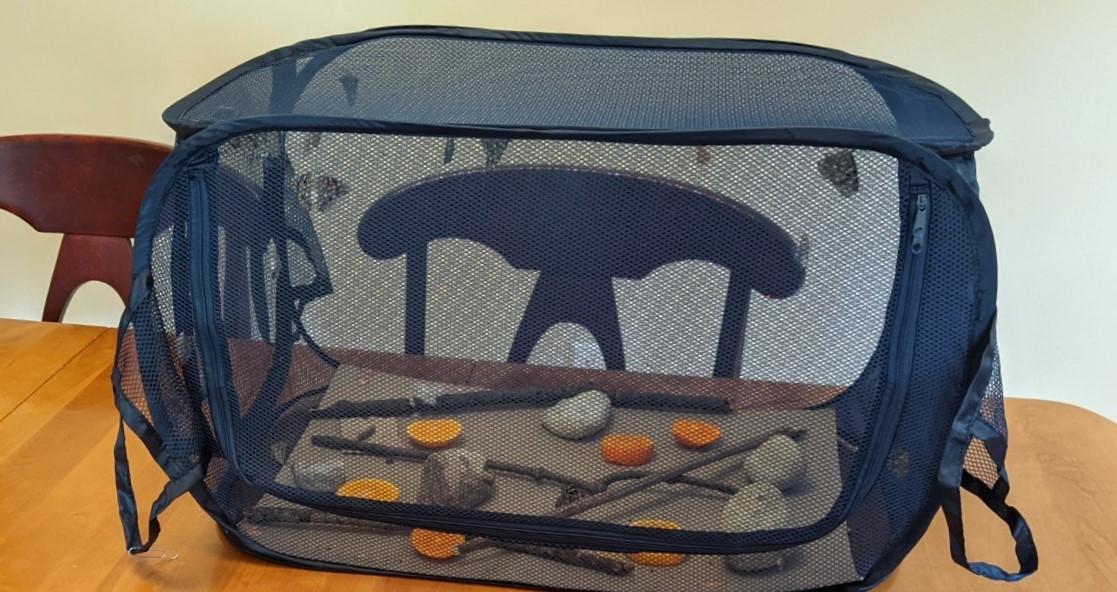
One caterpillar in a small jar or container is fine if you plan to release it as soon as the butterfly emerges. If you have several caterpillars and/or want to observe them for a couple of days as butterflies, then a larger enclosure is better. This could be a mesh laundry hamper, a small aquarium/terrarium, or even a clear plastic bin with a screen or mesh lid. Include sticks, rocks, and greenery so that the butterflies can climb up and spread its wings once emerged. Information on host plants for Painted Lady butterflies is abundant. Search it up online and you might learn that you already have the perfect host plant growing in your garden!
Several butterflies in a large mesh enclosure, soon to be released outside:
Release the butterflies on a warm day in your yard or at the park:
Create and Craft Christmas–Art Ideas and Inspiration
Written by Julie Bisnath, BSW RSW
I think for most of us, we know deep down that art is good. We know that children learn from doing. We appreciate the artistic talents of others. We have good intentions and great ideas (thank you Pinterest!). Where we sometimes get bogged down is in the logistics, the preparation, and most importantly, the mindset:
- Making the commitment to offer more process oriented art.
- Allowing the children to come and go from the “art table”.
- Having them decide what materials to use, how to use them, how much or how little to use, and when to stop.
- Understanding that art is not always about having a “finished piece” or “product”.
- Knowing and preparing for the fact that there might be some mess.
- Accepting that art ideas and interests are as subjective as the art itself.
- Embracing the learning and creativity that comes from consistent, unstructured (not unsupervised!), access to art.
When we really challenge ourselves to shift our mindset and include art as a part of our children’s daily experience, we open the door for them to explore, express, innovate, create, craft, discover, wonder, imagine, question, problem-solve, enjoy, and so much more. We build confidence, pride, and self-esteem. We instill and nurture a sense of agency, mastery, accountability, self-efficacy, and ownership.
If providing daily access to open-ended art seems difficult or unmanageable, start with changing only one or two small aspects of your usual art activity/routine. Try to increase access to art. Try to include new or different materials. Think about how to arrange your time and space to be “art-friendly”. Follow the interests of the children. Extend books or dramatic play onto the “art table”. Invite the children to suggest ideas.
Offer art activities often, provide variety, and modify as needed. Follow the cues from your group. Consider the age range of your children, their varied abilities, and their individual interests. Most importantly—is there joy? Are the children curious? Is there wonder and delight? Lead with a happy heart, be open to new experiences, and share in the learning—enjoy the opportunities and your children will too.
Many of my favourite holiday activities involve art, crafting, and creativity. Here are a few ideas for inspiring art and supporting the artistic and creative expression of young children:
Ideas for Encouraging Process Art:
- Messiness is ok and to be expected! This does not mean that the children are permitted to paint your walls or each other! Have them wear play clothes so no one has to worry or feel anxious about getting dirty. Talk to parents ahead of time and explain the concept (and value!) of process art. Have clean up items (towels, wipes, water, etc.) readily available.
- Provide access to open-ended materials—paint, fabrics, water, shaving cream, glue, markers, chalk, paper, pompoms, collage items, clay or play dough, bits and bobbles, etc. You do not have to provide all of the materials at the same time! Too many options can be overwhelming. Large amounts can also be too much—start with a little and add as needed.
- Supervise without providing instruction. Lead by example. Enjoy exploring and creating with the children. Try new things. Get messy!
- If it’s easier—go outside! This is especially true for glitter! Or go outside just for fun and to experience process art in a different environment.
- Introduce materials and tools found in nature: twigs, stones, leaves, grass, etc.
- Use recycled objects: bottle caps, sponges, containers, toothbrushes, bubble wrap, etc.
- Try to allow for long periods of time and/or have the art materials available for children to access and explore throughout the day.
- Comment occasionally on the specifics of the process and/or ask questions: “I noticed that you are using the toothbrush to move the paint around on your paper.” “You mixed glue with paint. What happened to the colour? What does it feel like?”
- Let the child decide when they are done and whether or not they want to keep the end result. Do they want to include their name? If so, where?
Ideas for Encouraging Product Art:
- Keep the project age appropriate and set the children up for success (i.e. pre-cut any difficult shapes, pre-measure any difficult ingredients, etc. but let them do as much as they can themselves).
- Provide several models so that the children have a guide but also know that their product does not need to look exactly like one specific model.
- Offer choices: colour/texture of material, added ingredients (raisins or chocolate chips?), glue stick or glue pot and spreader, etc.
- Explain the steps and do the project together (each person can do their own or it can be a combined group effort). Provide visual aids and examples of each step.
- Help the children understand that with some projects following the steps and directions are important. Ask questions. Encourage problem solving. Give them opportunities to learn and practice new skills.
- Do not correct or fix their work—3 eyes and 5 legs are ok! For older children, if the product didn’t quite turn out (to THEIR expectations) that’s ok too, focus on what went well and encourage them to try again. Learning any new skill takes perseverance and lots of practice!
- Focus on positive outcomes: “We did it! We followed all of the steps and now we each have a duck! My duck is yellow, with one eye, and green feathers. Tell me about your duck!”
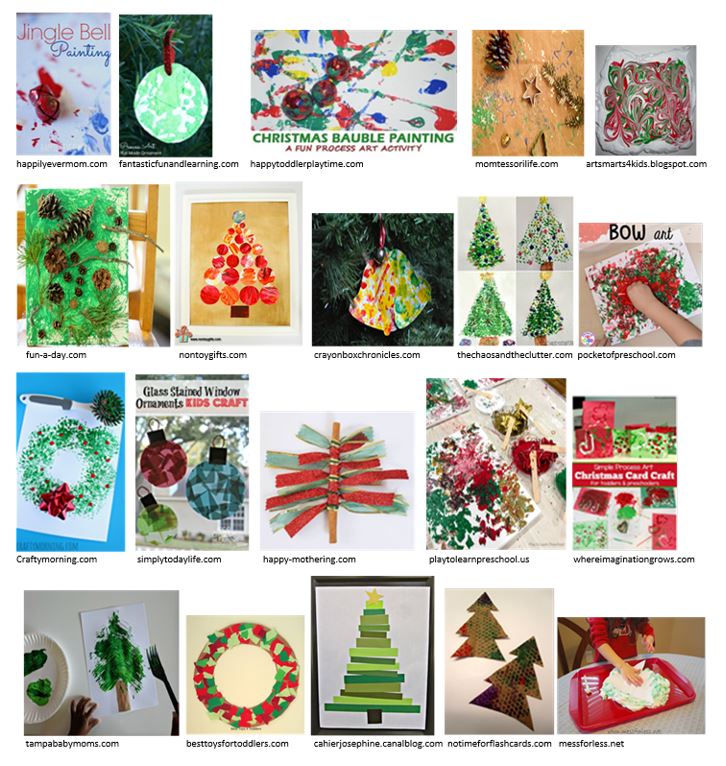
Examples of Christmas Process and/or Product Art
These ideas can all be modified to better suit the age of the children:
- Marble, golf ball, or jingle bell painting (on plain or pre-cut paper to have a product)—use a tray or closed container (place the paper inside the closed container).
- Bubble wrap prints (on plain or pre-cut paper to have a product).
- Collage of various Christmas materials and textures (fabric, paper, old cards, ribbon, etc.).
- Paint using evergreen branches.
- String beads on pipe cleaners to make an ornament.
- Provide a sensory experience and offer to make prints on paper or pre-cut shapes.
- Use Christmas cookie cutters to stamp with paint.
- Make and paint salt dough or clay ornaments with the children.
- Spice art: the children apply glue and then sprinkle on spices (ginger, cinnamon, clove, etc.). Use plain paper or a pre-cut shape.
- Paint with various tools (spray bottles, squeeze bottles, droppers, pompoms, fingers, Q-tips).
- Provide contact paper and a variety of Christmas bits (sequins, glitter, ribbon, etc.).
- Use the end result from process art to make a card or framed piece of art.
Baby Doll Circle Time™
Written by Julie Bisnath, BSW RSW
“Circle time” has always been one of my favourite times of day—as a child and as an adult too. I love to sing and to sing along with others. When I was in elementary school we’d often have sing along assemblies and growing up, hymns were my favourite part of our weekly church service. Family gatherings often included one or more instruments and I’m no stranger to a good old kitchen party. I love to sing. I’m not great at it but I love it just the same.
Last year, I wrote a more general Circle Time Resource Guide that CCPRN members received along with their 2020 memberships. If you’d like to take a look, you can read it here: https://gallery.mailchimp.com/c2347f6794b4b0e79de6d2902/files/ff9b997d-7bc3-499c-aaeb-ede2c28f42d5/CircleTimeResource.pdf
Today, I want to focus more on a specific type of circle time called Baby Doll Circle Time™. Baby Doll Circle Time™ combines my love for singing with my passion for teaching empathy, kindness, and caring. Baby Doll Circle Time™ was developed by Dr. Becky Bailey and is a trademark of Conscious Discipline®. The theory behind Baby Doll Circle Time™ is that children develop best within the context of caring relationships. Baby Doll Circle Time™ provides the opportunity for young children to experience being the nurturer by interacting with their baby dolls (or teddy bear) in the same ways that we as caring adults might interact with them. As the children play with their dolls, they relive and strengthen the attachment and connection that they have with their caregivers and parents.
The goals of Baby Doll Circle Time™ are to:
- Enhance attachment
- Increase self-regulation
- Promote trust
- Foster attunement skills
It also provides a wonderful opportunity for young children to develop, experience, and practice compassion towards others by building connection.
Baby Doll Circle Time™ focuses on building connection through:
- Eye contact
- Gentle, appropriate touch
- Being present in the moment
- Playful interactions
There are 5 main steps to a successful Baby Doll Circle Time™. The first is to transition into the circle and to have the children “get their babies”. You can transition to circle in your usual way—with a song or a visual cue, etc. Next you can incorporate having the children “get their babies” by having them close by (I find a bin or basket works well) and then singing the song “Get Your Baby” written for this purpose:
Get Your Baby (tune of Oh My Darlin’ Clementine)
Put out a basket of baby dolls. Use eye contact, joint attention, and gestures as you sing to invite the children to take a baby.
Get your baby, get your baby, get your baby, it’s time to play.
Get your baby, get your baby, get your baby, it’s time to play.
You may need to sing this more than once to give the children enough time to get their baby and then sit back down.
Once everyone (including you!) has a baby doll or stuffed animal, it’s time to sing the songs that fall under step 2 “beginning awareness”, step 3 “connection”, and step 4 “cuddling and soothing”. You can follow along with my version here https://ccprn.com/wp-content/uploads/2020/04/Baby-Doll-Circle-Time.pdf or make up your own. The idea is that the songs all promote caring and gentleness.
Step 5 ends Baby Doll Circle Time™. I always end by putting the babies to bed and then transitioning to Sleeping Bunnies but you can do whatever works for your group.
Goodnight Song (tune of Good Night Ladies) Use a soft and then an even softer voice.
Night, night, babies. Night, night, babies. Night, night, babies, it’s time to rest your eyes….shhhhh
Night, night, babies. Night, night, babies. Night, night, babies, it’s time to go to sleep….shhhhh
“Goodnight baby, I love you”. (Place the babies back in the basket)
Transition to Sleeping Bunnies: “Now that the babies are sleeping, you can find a spot to lie down and we’ll do Sleeping Bunnies!”

It may sound a bit complicated but trust me it’s not. It’s fun and lovely. Most children really enjoy the interactive component of having a special doll or stuffy to care for during circle time. Here are some simple strategies for implementing Baby-Doll Circle Time™ with your group:
- Be consistent, follow the same circle time routine, especially in the beginning while the children are getting used to the concept.
- Model the actions and attunement by having a baby doll for yourself too.
- Use familiar songs, rhymes, and social games—those that you might use with an infant or toddler in your care–or ask their parents for ideas.
- Talk about gentleness and the importance of being kind and caring.
- Notice and comment on the children’s participation: “I love how you are holding your baby doll so carefully. Your baby will feel safe with you”.
If you’re still feeling a bit unsure, you can view my Baby Doll Circle Time™ demo video here: https://ccprn.com/wp-content/uploads/2020/04/JuliesBDCT.mp4 and/or access my full song list (and lyrics!) here: https://ccprn.com/wp-content/uploads/2020/04/Baby-Doll-Circle-Time.pdf.
For those of you looking to do a French version, Lise Beauchemin has created a lovely “Le cercle avec poupée” which you can find here: https://ccprn.com/wp-content/uploads/2020/04/Le-cercle-avec-poup%C3%A9e.pdf.
If you’d like more information on Conscious Discipline® or to see official Baby Doll Circle Time™ promotional videos you can take a look at these resources:
- Conscious Discipline® consciousdiscipline.com
- Baby Doll Circle Time™ – Meeting the Needs of All Infants and Toddlers: youtube.com/watch?v=XWsGWqvi3RA
- Baby Doll Circle Time™ – Tips from the Author Dr. Becky Bailey: youtube.com/watch?v=Ihx7mzkIQAA
I really do hope that you’ll give it a try—whether you are a parent with one child or a home child care provider with a full group, Baby Doll Circle Time™ is a wonderful activity to enjoy together.
Yours in caring and sharing.
Loose Parts Play
Written by Julie Bisnath, BSW RSW
Coined in the early 1970’s by Simon Nicholson, the concept of “loose parts” came from his belief that the use of open-ended materials in childhood was strongly linked to creativity and critical thinking skills later in life. It has since become a central component of many early learning environments and you can find lots of research and information pointing out that loose parts play does indeed develop skills across the entire continuum of development.
“Children need opportunities to be creative and inventive in their environment, manipulating and constructing their ideas through play. This result can be achieved through the introduction of unstructured play with loose parts.” https://www.cpha.ca/loose-parts-policy
Essentially, loose parts are any open-ended bits and pieces that have no intended purpose or specific play goals. They can be moved around, added to, organized, taken apart, and used in many different ways allowing children to be creative, to explore, to investigate, and to learn from their own experiences manipulating the pieces. Basically, any collection of natural or man-made materials can be thought of as “loose parts”.

www.loosepartsplay.co.uk
Natural environments automatically provide a rich assortment of loose parts. Think about the ocean side with water, sand, shells, and rocks or a lush forest bed filled with sticks, stones, leaves, dirt, pinecones, moss, and bits of bark. The opportunities for play and learning are endless. Children are invited and encouraged to use their imagination (the stick is a wand!), to develop analytical skills (which pinecones are sturdy enough to support a bit of weight?), and to test out their own ideas and hypotheses (small rocks float and big rocks sink). They use the materials in new and inventive ways. With no right or wrong way to play, children enjoy the freedom to explore and create without the typical constraints of store bought toys meant to do one or two specific things. Loose parts play also fosters self-confidence and builds resilience as children are free to re-use the materials and experiment with a variety of ideas. It gives them the opportunity to try and try again.
“Loose parts pave the way for critical thinking. It allows the children to have their own ideas, to make things the way they decide, and to figure out for themselves how to make their idea work.” www.thewideschool.com/the-theory-of-loose-parts.
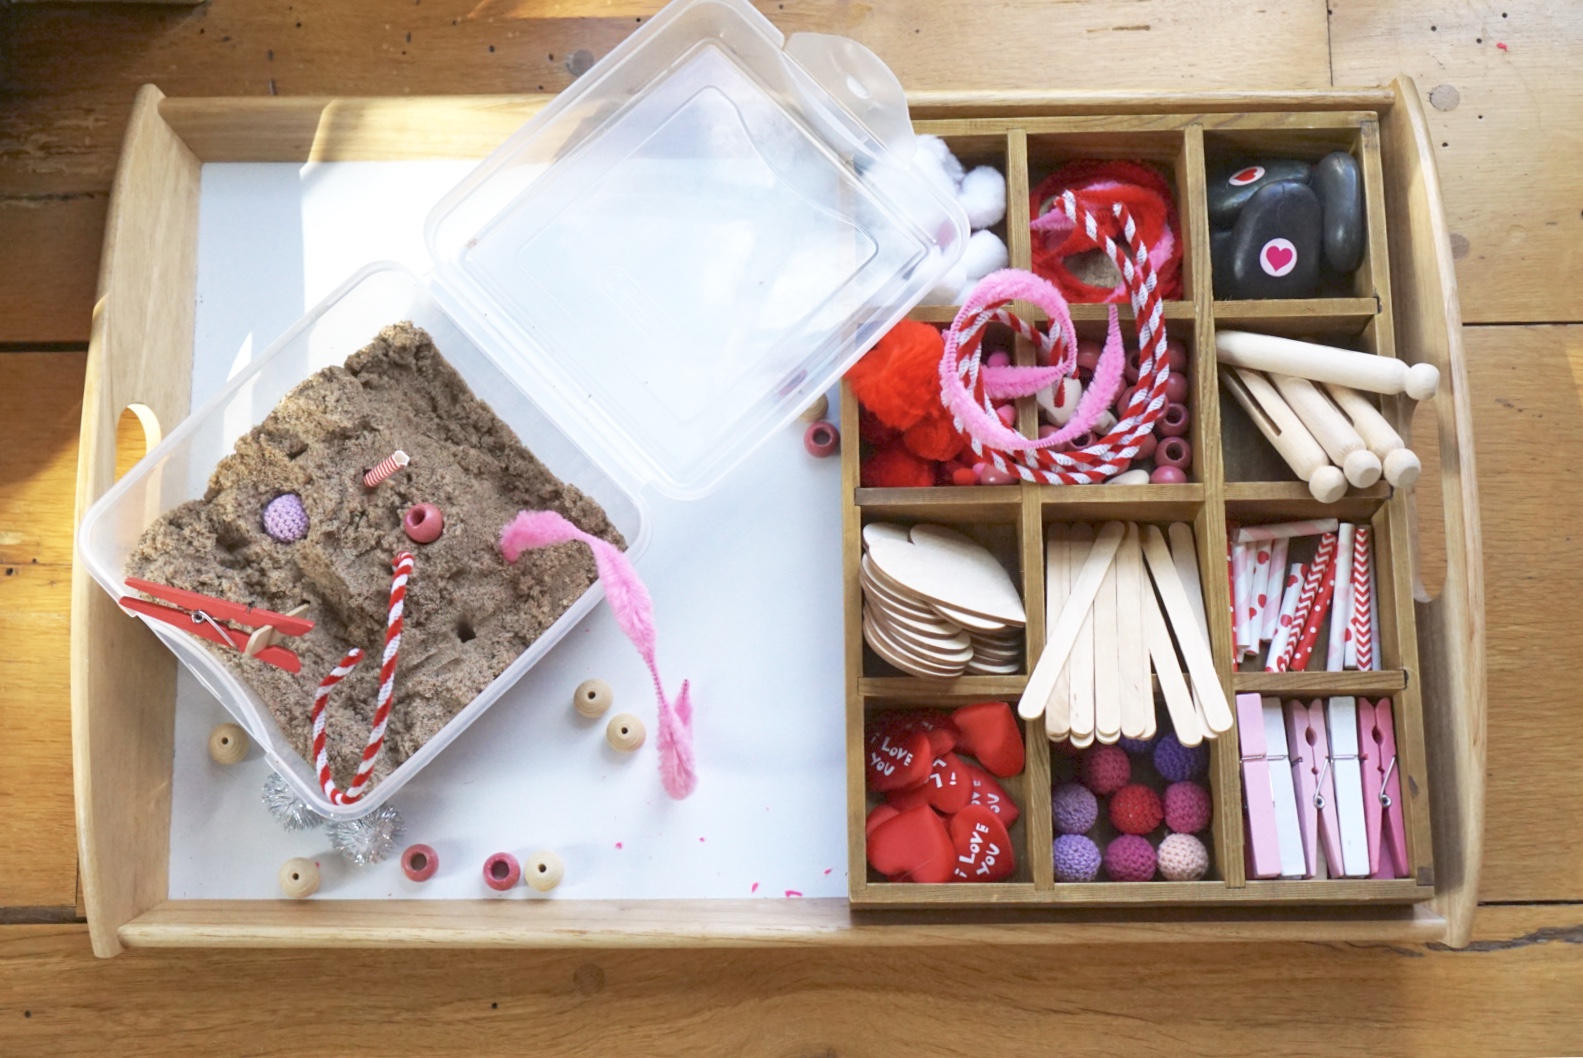
No need to take a day trip though (although how wonderful to spend the day lakeside or in the woods!)—you can incorporate loose parts play right in your own backyard or indoor play space.
A simple way to get started is to use what you already have at home: blocks, large pompoms or cotton balls, large popsicle sticks, balls, and recycled paper towel rolls set out on the floor are perfect for toddlers. Older preschoolers might enjoy a variety of smaller loose parts added in: clothes pins, gems, shells, rocks, pinecones, and spoons. A sensory bin filled with miscellaneous materials sets out an intriguing invitation. Another option is to try table top loose parts—have the children sit at the table each with their own tray or shallow box of loose parts to examine and explore. This works well with a mixed age group as you can tailor the items specifically to each child, following their interests and abilities to manipulate the loose parts safely. This set up is also helpful if you are trying to minimize having the children touch or share common items. Perhaps you have kindergarten or school age children who would enjoy some gross motor, outdoor, loose parts play? Scavenge your basement, the garage, or ask your local hardware store for discarded materials: old tires, broken bricks, bits of lumber, large industrial rolls (sturdy cardboard inside large bolts of plastic or fabric), recycled yogurt containers, milk crates, and rope make a good start. Recycled materials (containers, cardboard boxes, plastic bottle caps, etc.) are free and also helpful when it comes to clean up—no need to wash or disinfect, when the children are done playing out into the bin they go. Dollar shops and thrift stores are another great place to look for loose parts—think about wooden napkin rings, bits of hardware, craft supplies, bins, baskets, etc. Know someone who likes to sew? Ask them to set aside the empty spools. Friendly with a local merchant? Ask them to keep the inside plastic piece from the cash register paper rolls. Going out for a walk? Bring along a bag to collect pinecones, rocks, sticks, leaves, etc.
 https://www.pinterest.ca/pin/224265256432558622/
 https://www.ureadyteddy.com/toddler-tinker-trays/
Just as there is no right or wrong way to play, there is no right or wrong way to offer or set out loose parts. Through trial and error, you’ll discover what works for your space, and what works for your children. Follow their lead and enjoy the limitless potential of loose parts play.
As always, children need to be closely supervised when playing with loose parts. Be sure to select items that are age appropriate and suitable to the child’s skills and abilities.
A sample list of bits and bobbles from: Loose Parts Play
Stones, rocks · Tree stumps · Logs · Pebbles · Gravel · Twigs · Sticks · Washers · Planks of wood · Coconut shells · Corks · Ping pong balls · Pegs · Bulldog clips · Duct tape · Straws · Marbles · Decorative stones · Spoons · Curtain rings · Paperclips · key rings · chains · tape measures · Pallets · Balls · Buckets · Baskets · Crates · Boxes · Rope · Tyres · Shells · Seeds & seed pods · Pine cones · Old CDs or DCDs · Ribbon, string tape wool, lace · Metal tops from bottles & Jars · Cardboard cylinders · Raffia · Cable reels · Feathers · Pasta · Costume jewellery · Pots · containers · Glass beads · Cable ties · Guttering & drainpipes · Garden trugs · Tarpaulin · Nuts & bolts · Bark & moss · Leaves · Coins · Old bike wheels · Small slices of logs · Empty food cans (not sharp) · Netting · Garden canes · Dried peas, beans, rice · Wood off cuts · Torches · Cameras · Dice · Gourds · keys
Online Resources and References:
How NOT to Cheat Children: The Theory of Loose Parts
Simon Nicholson and The Theory of Loose Parts – 1 Million Thanks
Playing with Loose Parts: That’s How Learning Happens!
Canadian Public Health Association: Loose Parts Policy
https://www.cpha.ca/loose-parts-policy
Looking for more in-depth reading? Check out the Loose Parts Play Toolkit: https://www.inspiringscotland.org.uk/wp-content/uploads/2019/07/Loose-Parts-Play-Toolkit-2019-web.pdf
Art & Early Learning Opportunities for Young Children
Written by Julie Bisnath, BSW, RSW
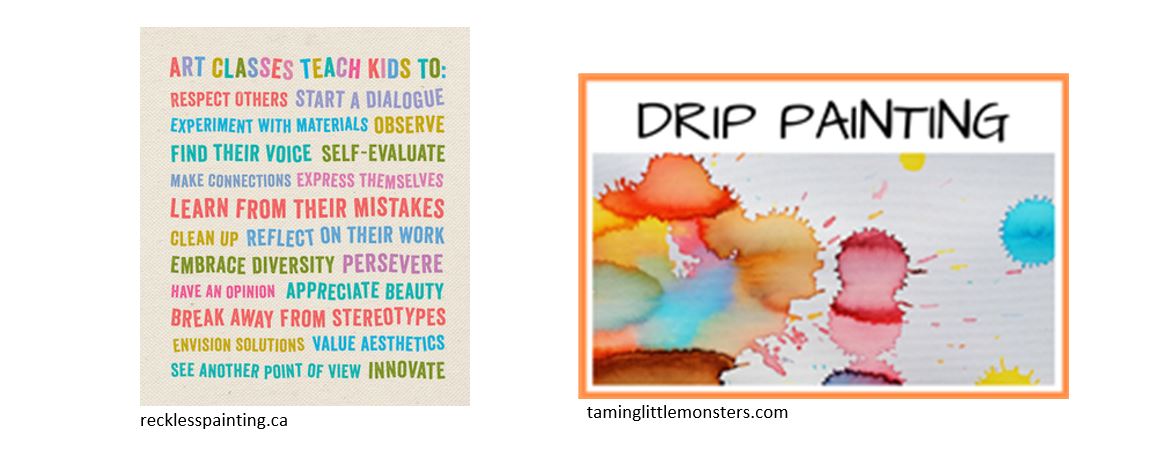
“Process art” or “open-ended art” is art that focuses on the experience of doing rather than the finished product. It allows children the freedom to explore various materials and mediums without the constraints of “producing”. Process art often does produce beautiful, interesting, and unique results but this is not its purpose. Children may or may not want to keep the end piece. The successfulness of process art is measured in terms of the child’s joy, wonder, and curiosity during the experience of doing—the process of creating.
“Product art”, also known as “crafting”, has developed a bit of a bad reputation in the field of early learning—“craft”—it’s almost become a dirty word. But WAIT! It needn’t be considered as such if your intent is to teach. The difficulty lies in the confusion between the words “art” and “craft”. When working with children, thinking about them as two separate words or activities (i.e. process versus product) helps to see the individual distinctions, benefits, and worth of these two terms (although there is a HUGE gray area and certainly for many people crafting is art and art is crafting).
Process art teaches children to value the creative experience and to value experimentation. It allows them opportunities to explore with their senses, and to experience materials and mediums as they relate to one another. It provides inquiry based learning and the opportunity to use, manipulate, explore, and express with a variety of tools and techniques. It teaches children that there is no right or wrong way to create art. Process art is meant to be a calming and relaxing experience. Children make decisions regarding how much, how little, where, when to stop, etc. It teaches children that their art is their own.
Product art teaches important skills too! Patterning, math, problem solving, planning, sequencing, reading, following instructions, working towards a goal, perseverance, and determination to name a few. When we introduce and expose children to simple crafting (product art) we are setting the foundation for later skills and abilities used in everyday life: completing a recipe, putting together furniture, writing an essay, etc.…we are teaching children that these skills are important and take practice. Learning to hone a particular craft also develops its own skill set and is valuable in and of itself—think of baking, quilting, knitting, woodworking, crocheting, jewelry making, food preserving, etc.—all types of product art and all requiring the skills listed above. Finally, crafting often has strong generational and/or cultural roots. Sharing these types of activities with children fosters a sense of belonging and values family traditions.
A similar comparison would be to think about teaching a sport versus teaching the more general concept of physical activity. Is teaching a sport (with rules, and competitions, and structure) wrong? No, of course not. Is learning a sport the same as learning to be physically active? Not quite. They both have value and they both develop skills and abilities important for health and well-being.
So the big question is: Is providing opportunities for product art appropriate when working with young children? Is it ok to have the children cut and paste and draw, following an example, to produce a particular end result? Absolutely! — If your intent is to teach skills such as sequencing, planning, measuring, etc. The important thing to remember is that product art or crafting is not the same as process art and should not replace the many wonderful opportunities provided by process art for children to create, experience, and express themselves freely—without the expectation to please others or re-create a final product.
What about a compromise? Is there an option that allows for both process and product? Yes, of course! There are many ideas that can be modified to bridge the two together:
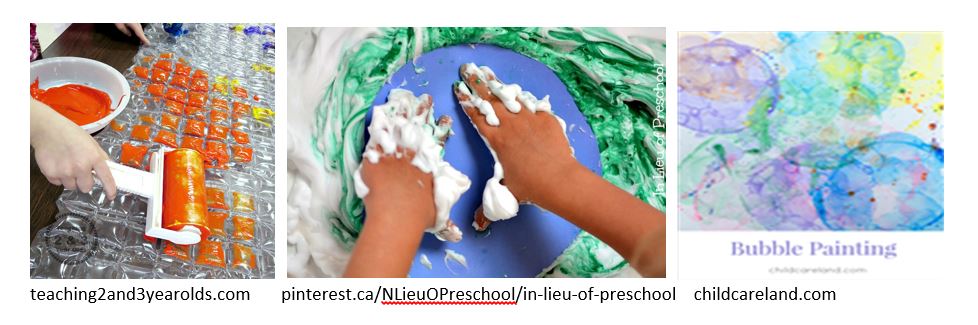
- Die cut large shapes and have the children paint them using a variety of tools and colours of their choosing. Older children can also learn by choosing and cutting out their own shapes. One step further would be to have the child draw the shape themselves.
- Provide a sensory art experience (like shaving cream and paint) and the option to make a print if the child wants. The print could be on regular or die cut paper.
- Die cut shapes and provide the children with assorted collage material (various types of paper and/or fabrics, various colours and textures, etc.) for gluing. For example provide large pre-cut pumpkins and many different types of orange fabrics and papers. The children get to choose from the various materials and they decide how much or how little to use.
In the end, there are many benefits to offering both process and product based art activities. Offer these activities often, provide variety, and modify as needed. Follow the cues from your group. Consider the age range of your children, their varied abilities, and their individual interests. Most importantly—is there joy? Are the children curious? Is there wonder and delight? Lead with a happy heart, be open to new experiences, and share in the learning—enjoy the opportunities and your children will too.
Ideas for Encouraging Process Art:
- Messiness is ok and to be expected! This does not mean that the children are permitted to paint your walls or each other! Have them wear play clothes so no one has to worry or feel anxious about getting dirty. Talk to parents ahead of time and explain the concept (and value!) of process art. Have clean up items (towels, wipes, water, etc.) readily available.
- Provide access to open-ended materials—paint, fabrics, water, shaving cream, glue, markers, chalk, paper, pompoms, collage items, clay or play dough, bits and bobbles, etc. You do not have to provide all of the materials at the same time! Too many options can be overwhelming. Large amounts can also be too much—start with a little and add as needed.
- Supervise without providing instruction. Lead by example. Enjoy exploring and creating with the children. Try new things. Get messy!
- If it’s easier—go outside! This is especially true for glitter! Or go outside just for fun and to experience process art in a different environment.
- Introduce materials and tools found in nature: twigs, stones, leaves, grass, etc.
- Use recycled objects: bottle caps, sponges, containers, toothbrushes, bubble wrap, etc.
- Try to allow for long periods of time and/or have the art materials available for children to access and explore throughout the day.
- Comment on the specifics of the process and/or ask questions: “I noticed that you are using the toothbrush to move the paint around on your paper.” “You mixed glue with paint. What happened to the colour? What does it feel like?”
- Let the child decide when they are done and whether or not they want to keep the end result. Do they want to include their name? If so, where?
Ideas for Encouraging Product Art:
- Keep the project age appropriate and set the children up for success (i.e. pre-cut any difficult shapes, pre-measure any difficult ingredients, etc. but let them do as much as they can themselves).
- Provide several models so that the children have a guide but also know that their product does not need to look exactly like one specific model.
- Offer choices: colour/texture of material, added ingredients (raisins or chocolate chips?), glue stick or glue pot and spreader, etc.
- Explain the steps and do the project together (each person can do their own or it can be a combined group effort). Provide visual aids and examples of each step.
- Help the children understand that with some projects following the steps and directions are important. Ask questions. Encourage problem solving. Give them opportunities to learn and practice new skills.
- Do not correct or fix their work—3 eyes and 5 legs are ok! For older children, if the product didn’t quite turn out (to THEIR expectations) that’s ok too, focus on what went well and encourage them to try again. Learning any new skill takes perseverance and lots of practice!
- Focus on positive outcomes: “We did it! We followed all of the steps and now we each have a duck! My duck is yellow, with one eye, and green feathers. Tell me about your duck!”
For more reading check out these links:
https://www.naeyc.org/resources/pubs/tyc/feb2014/process-art-experiences
http://www.ooeygooey.com/handouts/art.pdf